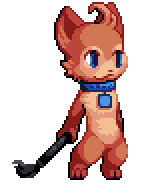
The Rundown
By Kevin
I'm going to try to give you some information on how to get started pixelling. I'll be covering the basics, specific techniques, and my own opinions. I'm not claiming to be the ultimate bastion of pixel-knowledge online, however. I'd highly recommend checking out Derek Yu's pixel art tutorial, which helped a lot when I was first starting out. Another good source for pixel info is Mark's Pixel Tutorial.
Tools
Basically, all you need is a computer and an image editing program. I use Paintshop Pro 7, but there are tons of great free ones that work just as well, including:
- Paint.NET
- The GIMP
- MS Paint
- GraphicsGale
- Allegro
It's all a matter of finding what interface you like, and getting used to it.
Other Suggestions
A lot of pixel artists like to do their lineart with a tablet. It's definitely not necessary, and entirely a matter of choice, but if you feel it would help you, by all means invest in one.
File Formats
One last thing, and I can't stress this enough. Always save your pixel art as a GIF or PNG. Never save it as a JPEG. Both GIF and PNG files use lossless compression. GIF files support animation, but limit you to 256 colors and no partial transparency. The PNG format was designed to replace GIF, and supports as many colors as you can put on a canvas, as well as alpha transparency.
JPEGs are terrible for pixel art, because a JPEG's compression wreaks havoc on the content of the file. It's not usually noticable in things like photographs, but it can devastate the quality of your pixel art.
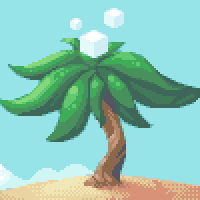

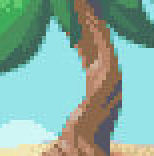
Lines
Lets start with the basics: lineart. Everyone has different methods of drawing their lines. A lot of people do it with a tablet. Some people draw a sketch on paper, then import it into their computer and pixel over it. I've always done everything with a mouse. Experiment to find what works best for you.
Step 1: Rough Sketch
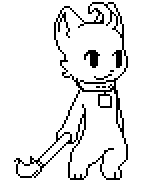
Use the mouse, or tablet, or whatever, to just sketch out a character or scene. I started here by doodling some sort of cat…thing. Let's call him Pix.
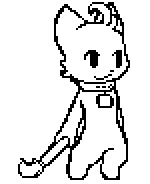
Step 2: Cleanup
Zoom in and give your sketch a good look over. Straighten up the lines, adjust lengths, finalize your picture. You can make adjustments throughout the whole process, so don't worry if you don't spot everything on your first cleanup. Try to not have any lines more than 1 pixel in thickness, unless you're intentionally going for a thick outline.
Tips: Curves and Angles
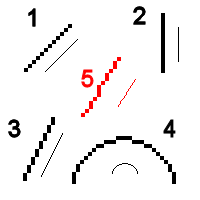
When drawing lines, keep this in mind. A perfect line, on a computer, is either a 90° angle or a 45° angle (ex. 1 & 2). A computer can't display a line crisper than that. Other good lines are generally made with 2x1 or 3x1 (etc.) smaller lines of pixels (ex. 3). For curves, use increasingly small lines of pixels as you round the edge (ex. 4).
Avoid awkward configurations for angled lines (ex. 5). Your line will end up looking bumpy and misshappen.
Coloring
Arguably the most important aspect of pixel art is color choice. Less is more, as they say. When picking out colors or a piece, try not to add in any extraneous colors (ones that are extremely similar to others you've already used). A single character probably won't go over 32 colors total by the time it's completed. Using too many can make the piece look sloppy.
Step 1: Color Selection
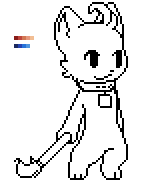
It's a good idea to choose the colors you want before you start coloring the piece. I usually pick out my colors and make a ramp of them from darkest to lightest next to the sprite. You can always go back and tweak the colors in your ramp, add in colors or take some away.
Step 2: Flat Colors
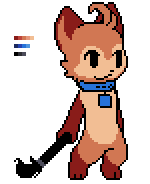
Now that you've picked out some colors, fill them in on the character. Don't worry about lighting or shading at the moment. Just put down what colors go where. In this case, I gave Pix dark paws and ears, and a light stomach and face. These don't reflect how the picture is shaded, just the color of the character's body.
Step 3: Shading
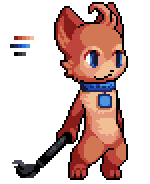
Now that you've got an idea of how the character looks with flat colors, start shading. Always choose a lightsource before doing this. Shading from the middle outwards is called "pillowshading" and almost always looks unprofessional and ugly. The example on the left is pillow shaded, while the example on the right uses a lightsource from the upper-right.

For this picture, I'm using the upper-right corner as my lightsource. In this stage, don't be afraid to add details in using the colors. Get creative.
Step 4: Selective Outlining (Selout)
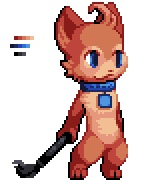
This step isn't necessary, as sometimes you want a black outline for style reasons. Other times you might not use any outline at all. But it's a good technique to remember. Selective outlining is the process of softening the outline by making it lighter. The lighter the colors next to it, the lighter the outline. I usually make an outline only a shade or two darker than the colors surrounding it.
Tips: Hue, Saturation, and Value
Almost all paint programs have a color wheel that lets you select individual colors. Most look something like this:
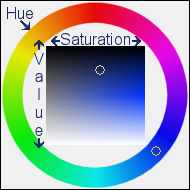
The circle on the outside represents the hue of a color. The box inside is organized by value (or brightness) and saturation. Lower values are at the top, higher values at the bottom. Saturation gets higher the farther to the right you go.
When selecting a color ramp, it's good to experiment with these attributes. Try shifting the hue a little bit. Make darker colors less saturated. These will help your image appear a little less flat and more vibrant.
 Color ramp with only shifted values.
 Color ramp with shifted values and hues.
 Color ramp with shifted values, hues, and saturations.
Dithering
Like I said before, color conservation is important in pixel art. Sometimes you just need to do a gradient on your character, or for your background. You could be cheap, and use the gradient tool included with most any paint program, but that could send your colors flying over 9000. This would really mess you up if you were saving a GIF file, and it's just plain against the spirit of pixel art.
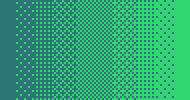
Dithering allows you to create a gradient by alternating pixel colors. I created a gradient here with 2 colors that crosses the same range as this automatically generated one, with 95.
 Machine Gradient
 Hand Dithering
Take note of the patterns in the dithering. To make a smooth gradient, you can't always just use 50/50 alternating colors. Try to experiment with patterns and see what looks good for you. I learned this particular pattern from Derek Yu's tutorial. This isn't the only way to dither.
Here's an example of dithering I used in a piece to create a gradient around the moon:
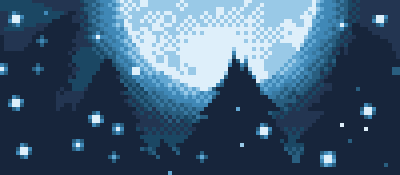
Stylized Dithering
Dithering adds texture. It's unavoidable. A lot of amateur pixel artists overdither their pieces and end up with a very rough looking surface that should appear smooth, because they overdithered the piece. Personally, I don't like to use dithering unless I'm trying to make a gradient, or I'm specifically trying to add texture.
With that being said, changing up your dithering patterns can add cool textures to your pieces, and really enhance things.
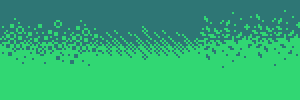
These are just some I pulled from the top of my head. As you can see, each creates a different texture. In my opinion, this is where the dithering technique really shines. Get creative with your patterns!
Let's apply it!
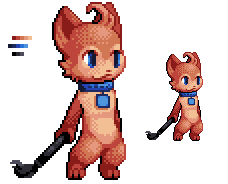
Here you can see Pix the cat thing after dithering has been applied. While it does help create some transition between the various shades, it also adds a lot of texture. Personally, I prefer the undithered version, but it comes down to a matter of personal preference. I tend to use a clean style.
Antialiasing
Here's where things get a little tricky. Antialiasing isn't a terribly hard concept to understand, but explaining it might be a little tricky. When it comes down to it, antialiasing is smoothing out the lines in a piece. The computer does it all the time. Just look at any text close up. It looks nice and smooth.

Up close there, you can see that they use lighter colors next to the dark, fading it into the background. When viewed at a normal size, the lines become smooth. Computers don't care about color conservation though. Those three words alone take up 28 colors, when the same effect could probably be accomplished with 3 or 4.
Basic Antialiasing
You'll be antialiasing by hand, of course. This is accomplished by finding colors in a range between those of your lines, and those of the background. I made an example here with black lines on a white background.
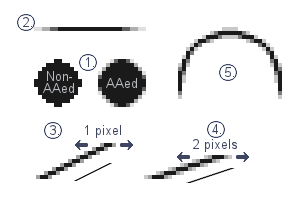
Example 1 shows the difference in quality between an AAed piece and a non AAed one. Notice how much more circular it looks than the flat 1-color circle next to it, which has much more jagged edges. Example 2 uses antialiasing to fade a line out. The further away from the black line the color is, the lighter it gets.
Examples 3 and 4 show how to antialias angled lines. For a 2x1 incline, you really shouldn't use more than 1 pixel to the left and right of the line. For the 4x1 incline on the right, I used 2 pixels for AAing purposes. The general rule is not to use more than half the length of the original line for antialiasing colors. In general, the fewer you use, the better. Too much antialiasing causes unwanted blurriness.
Ultimately, I suggest you practice the concept until you get a feel for it. It's much easier to antialias once you get an idea for what seems right to you. There aren't strictly defined rules to the concept, so much as guidelines.
Antialiasing Colors
This part is a little more complex than simply antialiasing black to white. When antialiasing between two colors, you also have to take in hue and saturation shifting (see the section on colors earlier in this tutorial). The concept is the same. Try to get colors that are partway between the line/object and background. It can take a lot more playing around when doing two colors of a similar saturation and value.
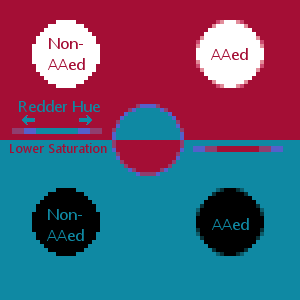
Antialiasing and Sprites
You cannot antialias the outline of a sprite. Transparency in pixel art is usually a single background color, marked as transparent in your respective image editor. That being said, anything antialiased to a transparent background color will only look right on that one color.

See how ugly that is? It'll only look right on the maroon background it was designed for. So don't even try to AA outside of a sprite. You can apply your antialiasing skills to some of the lines inside the sprite, but often it's not worth it. Use your best judgement when making an image with transparency.
Also see the Purloux antialiasing tutorial for additional information.
Transparency
This topic is a really simple one. A lot of pixel art relies on transparency, especially in regards to videogame graphics and standalone icons. Transparency is a great feature to make use of. Both the GIF format and PNG format support it. PNG actually supports partial transparency, but it's generally not encouraged in pixelart. It's also more complicated. This tutorial just focuses on 1-bit, single-color transparency.
Step 1: Define Transparent Area
To make a background transparent, all you need to do is find a color that isn't used anywhere else in the image and fill in all the parts you want to make transparent.
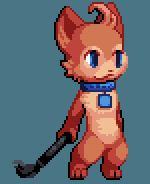
A common color is bright pink, but it's kind of an eyesore, so I frequently choose a random color in the blue-green spectrum. Anything is fine so long as it doesn't match exactly to another color in the piece.
Step 2: Setting Transparency
Every program handles this differently. I use Paintshop Pro 7, so the image below is in reference to that program. You need to look in your menu for an option that says something along the lines of "choose palette transparency."
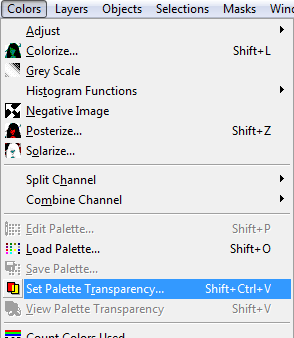
This is what the option looks like in Paintshop Pro 7. It's probably a similar name, and in a similar area, for other programs like Photoshop. I don't personally know.
MSPaint doesn't have this option, to my knowledge. If that's your program of choice, don't despair. There are websites online, like IAZA, that let you do all sorts of neat stuff like transparency and whatnot.
Just click the Load Image text at the top of the page, find the picture you're working with in your harddrive, then go over to transparent under transform on the far right. Then follow the instructions they give you.

And that's pretty much it, believe it or not. Your new image should have replaced the color you chose with a transparent background. Any image or background color behind it will show through, like so:
