The Antialiasing Tutorial
By Jon
Note: This tutorial presents a detailed overview of the theory and process of antialiasing. It attempts to be complete in the sense that a person who knows nothing about AA can read it and immediately apply the techniques detailed herein. Seasoned pixel art veterans will notice some subtle innacuracies; for the most part, these are well-intentioned glossings-over of deeper pools of information, to make learning easier while still encouraging further investigation and experimentation. Antialiasing, like pixel art as a whole, is an extremely broad subject, and each artist's approach will be different.
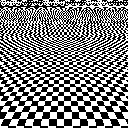
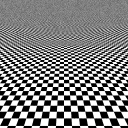
Antialiasing is a technique that is used in image processing to attain sub-pixel accuracy. Commonly used in pixel art, the technique allows the artist to trick the viewer's brain into seeing details that are smaller than the size of a pixel, causing an image to appear smoother, more detailed, and often more appealing than its aliased counterpart.
So without further ado, let's get started!
How it Works
Let's say you have an image two pixels wide by two pixels high:

If you wanted to size this image down to, say, one pixel square, you could take one of two routes. Your first option is simply to get rid of three of the original pixels. If you do this, you have cut out 75% of the information—three pixels out of four—that the original image contained.

This information loss is unavoidable. There is simply no way for one pixel to store the amount of colour information that four pixels can contain.
You'll notice that the information in the cropped image doesn't accurately correspond to all of the pixels of the original: only one of the source pixels contributes to the destination image.
In pixel art, more than perhaps any other medium, information is very important. The other option is to average all of the information in the original image together. If every source pixel gets equal representation, then despite the fact that the destination image contains the same amount of information, the information that it contains is more accurate.

When pixels are averaged together in this way, the resulting image has one very important property: it fools the brain into believing that all of the pixels of the original are still there, but that they are smaller than actual screen pixels. The resulting image is, effectively, antialiased.
With That in Mind
Since this is an AA tutorial, we might as well get into, well, AA. How about we antialias a line? Sounds simple enough. To make it easy on ourselves, let's make a black line on a white background. Fascinating, I know.

The next step is to scale the line up by 200%. In Microsoft Paint, this can be done using Image > Stretch/Skew. If you're using a more complete image editing application such as Adobe Photoshop or the GIMP, be sure to disable interpolation (or set it to constant, nearest-neighbour, or similar). This will ensure that the software does not perform any smoothing of its own when it scales your image.
After scaling, each of the pixels of the source image should be represented by four pixels in the destination image, all of the same colour as the source pixel. I'll show the working image zoomed in to give you a better view.
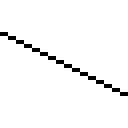
In case you haven't already heard the term, jaggies are areas of an image (usually lineart) that bear unsightly kinks due to improper pixel placement. Our scaled line is very jagged, with sharp corners every few pixels. Let's fix those.
If we add the pixels that are marked here in blue:
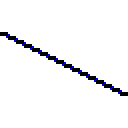
And remove the pixels that are marked in red:
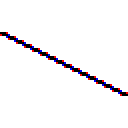
Then we'll get a nice line, twice as large as the original, using the same colours. It also happens to correspond directly to the original line, but at twice the resolution. Essentially, we've just given ourselves twice the information we had before. And I was just talking about the importance of information in pixel art. Stay with me, here.
How It All Relates
Recall the first example. We averaged down our original image to 50% its original size and it came out antialiased. Let's give it a try with our line. If you take a good look at which pixels we added and which we removed, you might recognise something from the first section and guess what's next.
If we divide the double-resolution line into chunks of four pixels, we can see exactly where the original line was cut up. Again, the pixels in blue are those that were added; in red, those removed.

Now it's time to scale the double-sized line back down. If we average the four-pixel chunks together, just like in the first example, we should get an antialiased version of the same line at half the size.

In this figure, you can see the result of averaging the chunks together, along with a ghosted outline of where our double-resolution line used to be. Now it's time to realise an important point: to make the double-resolution line, we didn't really make our pixels bigger; we just looked twice as closely at the same line. In reality, we weren't dealing with pixels. We were dealing with fourths of a pixel.

Allow me to reiterate. For every time we added a "pixel" to the double-resolution intermediate image, we were really adding a fourth of a pixel to the normal-resolution destination image. The same was true, naturally, when we removed pixels. When all is said and done, the antialiased line should look like so:

When we scale it back down to normal size—again, without interpolation—it should look something like this, with the original on the right for comparison.


You get it. It's antialiased! It has the same intensity as the original line, and contains the same amount of information, but the brain thinks that the pixels are half as big as they actually are, and consequently the line looks twice as smooth. Tricky, ain't it?
So, in summary, antialiasing eliminates jaggies that are smaller than pixels, and it does so by averaging colours together. With this understanding of the basic principles of AA, it's possible to perform all kinds of feats. Read on for examples of antialiasing in practice.
Using Other Colours
In order to antialias using colours other than black and white, you need to think in terms of the foreground colour and background colour. In our earlier example, some pixels retained 75% of the background colour and gained 25% of the foreground, while others retained only 25% of the background, gaining 75% of the foreground hue.
The general formula for combining two colours is as follows:
(Foreground Colour × Foreground Amount) + (Background Colour × Background Amount)
Where Background Amount is equal to (100% - Foreground Amount). In the first example, the foreground was black (⟨0, 0, 0⟩); the background, white (⟨255, 255, 255⟩). To calculate the colour of a pixel with 25% of the foreground and 75% of the background, we just need to plug in some numbers:
(⟨0, 0, 0⟩ × 25%) +
(⟨255, 255, 255⟩ × 75%)
= (⟨0, 0, 0⟩ × 0.25) +
(⟨255, 255, 255⟩ × 0.75)
= ⟨0 × 0.25, 0 × 0.25, 0 × 0.25⟩ +
⟨255 × 0.75, 255 × 0.75, 255 × 0.75⟩
= ⟨0, 0, 0⟩ + ⟨191.25, 191.25, 191.25⟩
= ⟨0 + 191.25, 0 + 191.25, 0 + 191.25⟩
= ⟨191.25, 191.25, 191.25⟩
The resulting colour is ⟨191.25, 191.25, 191.25⟩, which rounds down to ⟨191, 191, 191⟩. As you might expect, this is the very same light grey colour that appeared when we antialiased the line.
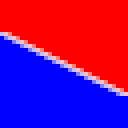
It's trivial to generalise this process to other colours. Below is a simple example of basic colour antialiasing in action.
Antialiasing Curves
Antialiasing curves is a slightly more general problem than AAing straight lines, but the same basic tenets hold. Try going through the same process of thinking about the curve at higher resolution. Think about which pixels you would add and which you would remove to get rid of jaggies in the curve. Then just change the colour of the pixels in and around the contour, in the very same way that you would with a line. It's easy as pie! Here's a visual example to illustrate the process:


Controlling Your Palette
Maintaining control over the size of your palette is one of the fundamental skills of pixel art. At first glance, it might seem that AA necessarily adds colours to your palette, but this is not strictly true. Since the process of antialiasing is already based to a certain degree on trickery, it's possible to take some license with your colours. The pixels involved in antialiasing need only change by approximately the right amount in intensity and hue in order to achieve the desired result, and intensity is far more important to the eye than hue. It only needs to be precise enough to look good.
Having to get out a calculator every time you want to figure out the colour of a pixel is going to be a pain. Learning to know which colours to use simply by intuition is the part of AA that is developed through nothing but loads of practice. The experience of doing is what gives each pixel artist their own unique style. While it's important to understand the theory behind any art technique in order to further your skill, it all comes down to practice and doing things the way that you and your audience think looks best.
A Word on Software
Software antialiasing is performed using a much less subjective method than the one I describe here. Depending on the particular use, software may perform antialiasing via oversampling, blurring, or by calculating the exact coverage of individual pixels by a mathematically precise representation of the line, curve, or region in question.
Software methods of antialiasing have optically pleasing results, but they have many problems that preclude their use in pixel art, not least of which is the sheer volume of palette entries that they produce. An ordinary black line on a white background can easily contain hundreds of different shades of grey, only a tiny fraction of which are actually necessary to achieve a result that looks nearly identical.
Conclusion
So that's about it. In summary, here are the general antialiasing rules to keep in mind:
- AA eliminates jaggies that are smaller than pixels.
- It works by averaging colours together.
- It only needs to be precise enough to look good.
- It can be used even in tight palettes with judicious colour reuse.
Happy AAing!
